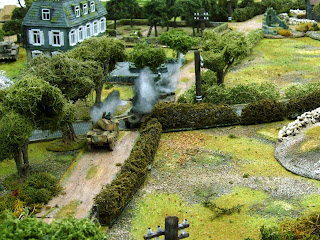
I really like the vehicle rules with Chain of Command so I thought it would be fun to try out a game using lots of armour.
One of my gaming friends said I would probably need a huge table for this to work in 28mm. I don't think this is the case if you set your table up with lots of terrain to block the line of sight.
You probably wouldn't send in armour without infantry support in this kind of terrain but as I mentioned above, I wanted the core platoon to be armour and not turn this into a BIG CoC game with two platoons, Infantry and Armour on each side.
I suppose this could represent Allied armour racing ahead of their infantry trying to close the gap of the Falaise Pocket from the fleeing German forces retreating in their vehicles.
I have worked out the platoons by using the cost from the support lists for a balanced game.
The basic platoon is four vehicles which has the Senior Leader. This will be either a Panzer IV or Stug platoon for the Germans and for the British a Sherman or Cromwell platoon with the fourth vehicle being a Firefly.
There is also recon vehicles and some heavy support for each side. A Puma and a Tiger 1 for the Germans. For the British a Humber MK IV and a Tetrach light tank for recon and an M10 Wolverine and Achilles to try and keep the Tiger in check.
To finish I have given each platoon two mobile tank hunting teams. Two Sdkfz 251's with a Panzerschrek team in each and two universal carriers with a piat team in each, so each player will have between nine or ten vehicles at his disposal.
I have been using 'Scenario 7', the 'Attack and Counter - Attack 'scenario from Too Fat Lardies Christmas Specials 2013, with some slight amendment's. Players will only be left with two JOP's after the patrol phase, plus a third JOP will be placed on the crossroads at each end of the table as the game objective.
RULE AMMENDMENTS
This being mostly a vehicle only game rather than an Infantry one, some of the CoC dice have a slightly different roll to it.
6 - as main rules.
5 - as main rules plus you may take a pip off your CoC dice if you have any, to increase the roll of your command dice. ( This is one of the new ideas taken from 'Fighting Season'.)
4 - Senior Leader
3 - Junior Leader
2 - No value by itself, needs to be added to another dice or use a pip from CoC dice to make it a 3 or 4.
1. Mobile Tank Hunting Team. (Panzerschreck and Piat teams in Halftracks and Universal Carriers, without a junior leader)
Apart from command tank with Senior Leader (4) each vehicle has a junior leader and will activate on a (3) or by radio via Senior Leader(4).
The tank hunting team activates on a (1) or/and (4) by the senior leader if still in their vehicle. If they debus and outside the senior leaders command radius, then not being within radio contact they will only activate on a (1).
Vehicles arrive on the table via one of the three roads on their table edge. This applies to the Tank Hunting Team but these also have the option of deploying from one of their JOP's, mounted or dismounted. They may also be used with a CoC dice using the 'Ambush' rules from main book.
----------------------------------------------------------------------
THE PLAY TEST.
After the patrol phase and deployment of JOP's, I rolled for morale and the British came off worse with level 8 to the German 10.
Both sides brought on their faster moving Recce vehicles to either try and establish a good defensive position where they could go into over watch well forward of their table edge or maybe try and snatch an enemy JOP early in the game.
The Brits may have had two recce vehicles to the German one but the Puma out classed them both when they came into contact.
Both sides started slowly bringing on more vehicles but the big decision was whether to bring on the platoon command vehicle to make use of all those 4's being rolled or to keep it off table a bit longer so that it could guarantee vehicles automatically coming on, on a roll of a 1 or 3.
The Germans got there act together quicker and started bringing on their Stug's and getting them into a good defensive position and placed on over watch. They also brought on the Tiger which advanced up and dominated the centre of the table.
The Brits were a little slower deploying but the fast moving Cromwell's with their Culin Prong hedgerow cutters, soon made up for lost time. (In the main rules, if a tank wants to go over a hedge, you roll 3 x dice and discard the lower dice, this is how far the vehicle moves. There is a risk though of the vehicle getting stuck if you happen to roll a double. I played it that if a vehicle was equipped with the hedgerow cutter, you would still discard the lower dice but there would be no chance of it getting stuck.)
A couple of Cromwell's advanced around their right flank keeping the Chateau and burning recce vehicles between them and the Tiger. The Puma had also come into the lead Cromwell's sights and was given a little payback for what it had done to the British recce section.
The tiger had positioned itself hull down behind the ridge commanding the centre of the table, so the Brits decided on a three pronged attack if they had any chance of getting rid of this beast. The Cromwell on the British right positioned itself between the smoking vehicles so that it could get a shot off on the weaker flank of the Tiger. Unfortunately the round bounced off the thick armour of the big cat but it must of rattled the German crew as they missed their return fire.
In the British centre, the Firefly positioned himself ready for a shot at the Tiger whilst it was busy engaged with the Cromwell on the right. Also on the left, on a roll of 1, the piat team deployed dismounted from its JOP ready to attack the Tiger from the left flank.
The Tiger rotated its turret back to its front to take on its biggest threat, the Firefly. It hit its target but the round bounced of the armour of the Firefly. With 12 x dice, needing to roll a 5 or 6, the Tiger only managed to score one, which the Firefly was able to save. The Firefly then returned fire with its 17 pounder anti tank gun and managed to take out the Tiger.
The German's may have lost their big cat but they had been busy getting the rest of their armour on the table. A Marder moving up into position to support the platoon of Stug's and one of the Half Tracks deploy near a JOP and the Panzerschrek team set up in the upper floor of a building.
The Brits bring on one of their heavy supports, an M10 Wolverine, which straight away gets into a fire fight with a Stug which had been on over watch. Due to the low armour save of the Wolverine it was dispatched before it had chance to use its powerful gun.
British morale was starting to drop and to make matters worse, the Firefly was destroyed by the Panzerschrek team which had gone on over watch in one of the buildings overlooking the approaching tank.
The British managed to destroy a Stug but the German platoon commander then took out his counter- part which brought the British morale crashing down and end of game.
CONCLUSION.
I was very happy with how the game played out and having the option of using the pips from the CoC dice to increase your command roll worked well but you had to way this up with letting the dice build up to get a full CoC dice for that Ambush/End Turn/Avoid Morale Test/Interrupt option.
The Stug's are classed as low profile and have good armour, which makes them good in defence but as they don't have a turret, their arc of fire is limited, which means you may have to move them before getting that shot in. As I also have a platoon of Panzer IV's this gives the German player the option of vehicle with better defence versus better attack capabilities.
The Tiger is a scary thing but it just goes to show that a low cost option like the Panzerschrek team can be a battle winning option.
The lads are coming around on the 4th August to try the game out, so it will be interesting to see how it plays out second time round.


