

I initially took pictures of the game as we went along but they were a bit rushed and the initial moves using blinds wasn't very photogenic, so I re-took the pictures staging the game as it developed.
SHARP PRACTICE – WAR OF THE ROSES.
BLOODY GREENSTEAD 1477 AD
The effects from the ‘War of the Roses’ reached out far and wide and had an impact on Cities, towns and villages all over Britain, and one such place was the small town of Greenstead.
This sleepy little hollow lay, unfortunately on the boundaries of Watford and Ongar, and ownership was in dispute between their mighty Lords who opposed each other in their support for the Yorkist and Lancastrian struggle.
Both powers were bleeding the town dry of taxes for their war chest and so, when one Lord came up with the initiative of placing a garrison in the town, the other immediately set out to prevent this.
They both made haste, approaching from the North and South roads to meet at what would become known as ‘Bloody Greenstead’ in the race for the control of the town, their hired mercenaries following only a short way behind.
The town official, Master Gisbourne’s priority was the safety of the town and people and so he would be slamming the town gates shut in the face of either Lord, at the first sign of any trouble………..Unless of course he could be persuaded otherwise.
OBJECTIVES
Secure and garrison the town of Greenstead before the arrival of your enemy without alienating the people if possible. These are your tax paying subjects, so try not to be too heavy handed, as you may well need to recruit a few for future garrison duty.
FORCES INVOLVED.
Big Men: Blue/Murray Green/White Initiative Level Influence Range
Lord Warren Smithson 4 18
Steward Perrill Hook 3 14
Master-at-Arms Snoball Slayton 2 10
Centenar Dancy Wilkinson 2 10
Ventenar Scarlet Will of the Dale 1 6
(Burgundian) (French)
Mercenary The Sire de The Sire de 2 10
Pike Bournonville Lanferelle
Mercenary Brabant Alencon 1 6
Shot
Town Official Gisbourne 1 Inside town walls.
Each retinue has;
Two units of Longbows
One unit of Billmen
One unit of Men-at-Arms
One unit of Mercenary Pike
One unit of Mercenary Shot.
THE GAME.
Lord Warren's Retinue approached the town of Greenstead along the South Western road, having secretly nominated this point, whilst his Burgundian Mercenaries would be travelling along the South Eastern road on turn three.


Lord Smithson's Retinue approaching along the North Western road, whilst his French Mercenaries will be entering from the N.E. on turn three.


The church bells sound the alarm and on the sight of the armoured men approaching, the local's head for the safety of the walled town.

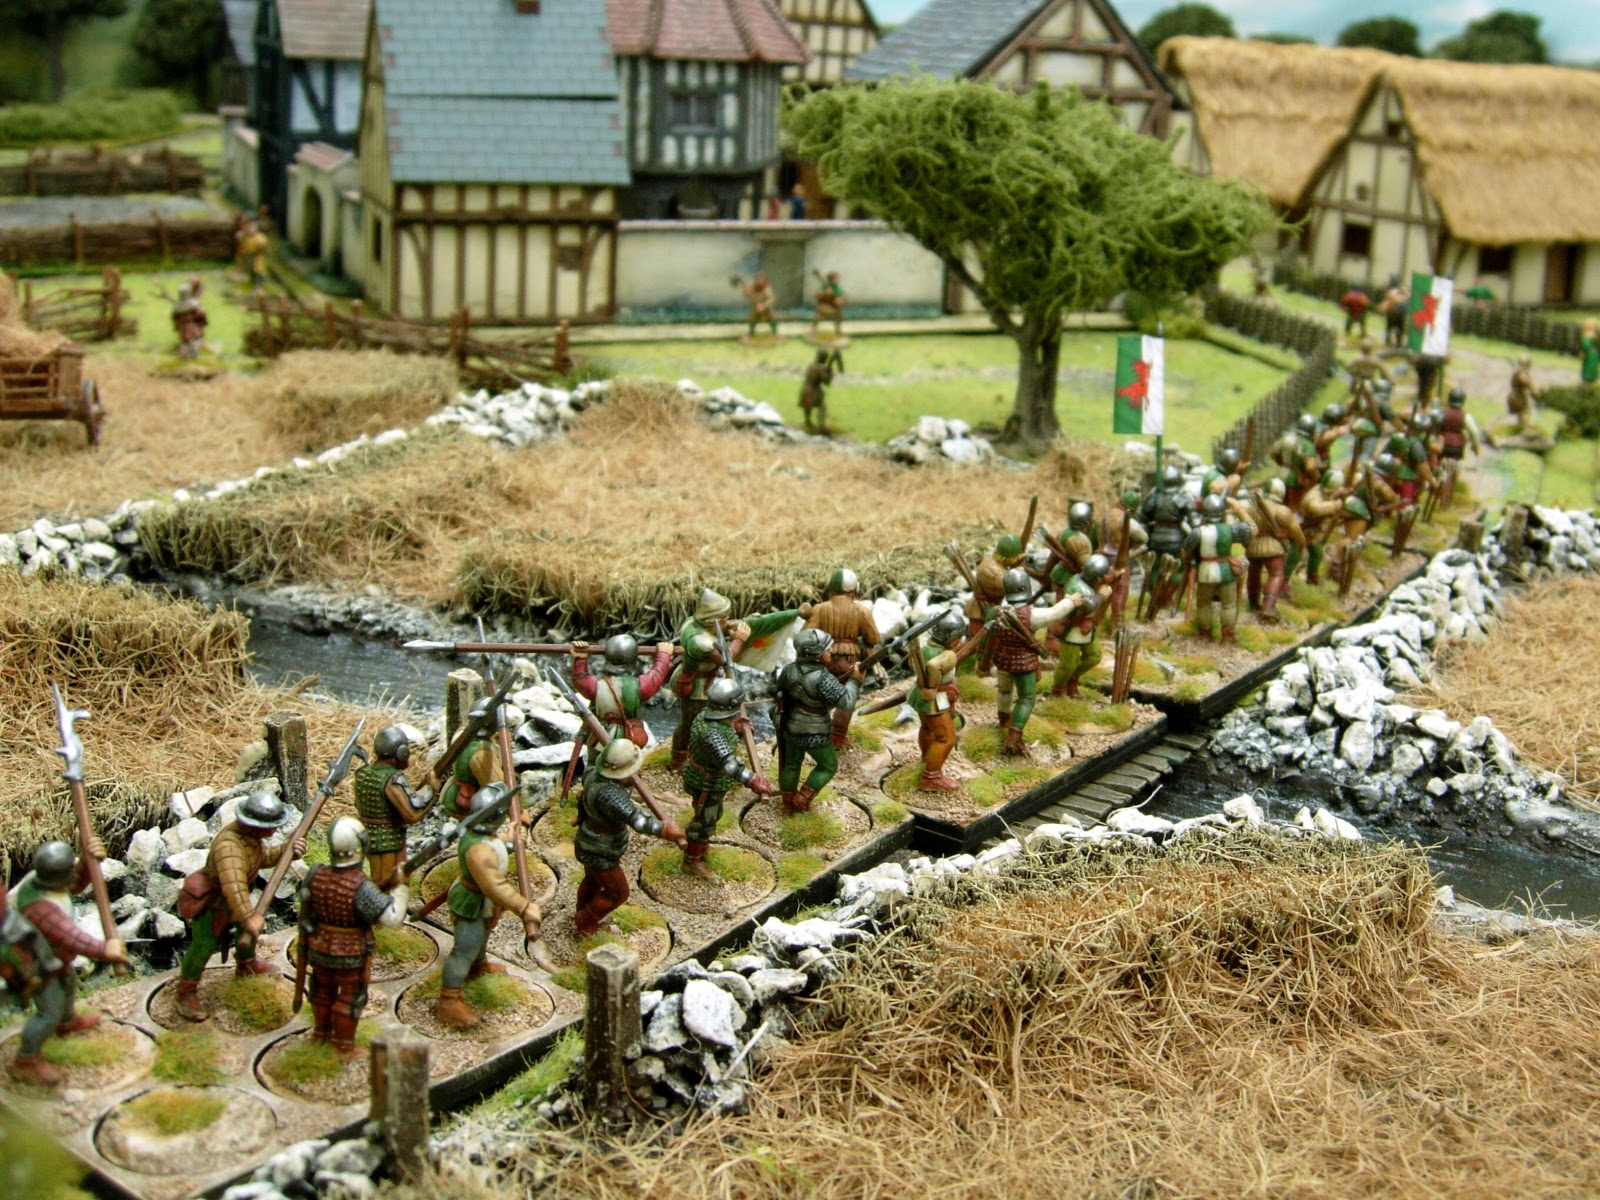
Lord Watford's vanguard reach the junction where both roads meet and deploys his bowmen to face the threat, whilst his billmen race towards the town's main gate.


Lord Smithson spot's the lead elements of the enemy and deploys his bow units to either side of the road, whilst his billmen advance straight ahead.


The mercenaries start to arrive from the North and South Eastern roads, the French Shot peel off and head for a small foot bridge, whilst the Pike carry on towards the main road bridge into town.

The Burgundians stayed in column and made good time approaching along their road.

Lord Warren draws the 'Church Blessing' card from the 'Bonus Deck' so he and the unit he is attached to are unable to move and spend the whole of that turn being blessed by the local priest.

The Burgundians make better progress than the French and reach the outskirts of the town in double quick time.

One of Lord Warren's 'Big Men' spends a couple of turns persuading the town official to open the gates and to let his rightful Lord occupy the town without using violence to enter.

Town Official, Master Gisbourne.

The longbows came into play and we found them to be a little to powerful. We adjusted them so that we would reduce the amount of kills we would get but increase the shock points, so that the units would have a better chance of staying intact but would back off and become less effective whilst carrying the shock points.
Unfortunately for me, I had lost a complete unit of bowmen apart from the leader and also my billmen suffered badly advancing against John's archers before we amended the rules.


Race for the town.. The enemy have already entered the front gate, so Lord Smithson and his Men at Arms head for the gate at the rear of the town, their flank screened by a unit of bowmen.

There were a selection of ladders and abandoned carts scattered around the table for use to help scale the town walls. The French Shot picked up one of these ladders and crossed a ploughed field, (slow going) attempting to scale a wall at the rear of the town.


Meanwhile the French and Burgundian Pike blocks clashed at the bridge East of the town, resulting in the French being driven back.

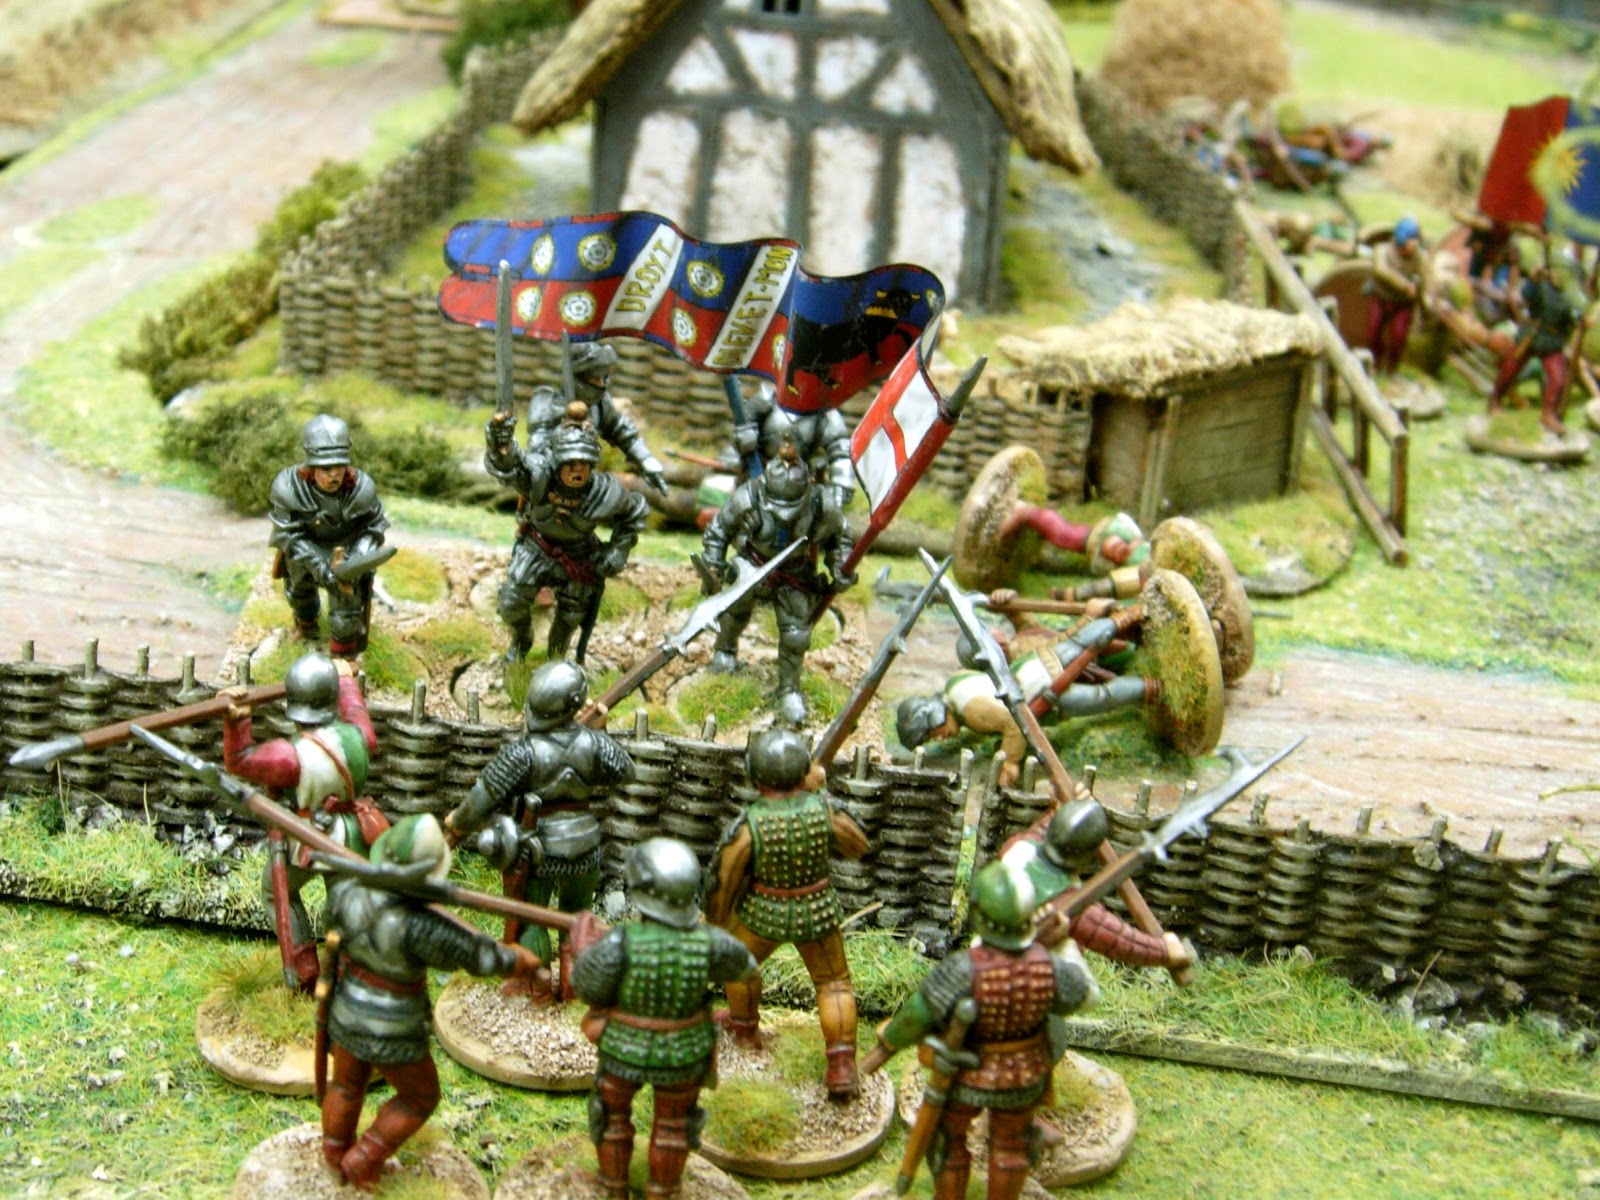
As Lord Warren's men had won over the support of the towns people, Lord Smithson had to spend a couple of turns breaking down the locked gate at the rear of the town.

Lord Smithson's last unit of bowmen were pulled back to assist in the assault on the town whilst the depleted billmen lined the wattle fence trying to hold off a charge by a unit of Lord Warren's Men at Arms. The billmen failed to stand and were driven back with casualties and shock points and eventually routed
off the table before getting the chance to rally. Things were not looking good for Lord Smithson with the loss of two units from his retinue.


The surviving 'Big Man' from the bow unit that was wiped out earlier, being persued back towards his own lines.

The last unit of bowmen had dragged a hay cart from a nearby field and brought it up to help them climb the town walls. By this stage the Men at Arms had battered the gate down and there was a three pronged attack ready to go in on the rear of the town. In the center was his Lordship and the Men at Arms assaulting the gate, on the right the archers climbing the walls with the aid of the cart and on the left, the French shot assaulting the walls with their ladder. What could possibly go wrong?


As the French shot were storming the walls, they were fired upon from their left flank, by the Burgundian crossbowmen who had worked their way around the town and were now in a good position to cause havoc with the attackers.

At the gate, the defenders were waiting in mass for Lord Smithson's men as they fought their way inside. I had 16 x dice and I needed to roll 5's to cause shock and roll 6's to inflict kills. I rolled one 5 and that was it, whilst John inflicted a pile of shock and a casualty figure on me, which was enough to drive me back out the gates again.
The bowmen on the right did better but with the centre and left receiving a bloody nose, Lord Smithson decided to withdraw from the field to lick his wounds and regroup to fight another day.

Due to being asked what my rule amendments were for the game, I have stuck them on the end of this post. They are not perfect and were the first draft but if they can be of use, then all well and good.
Pat.
SHARP PRACTICE -WAR OF THE ROSES
As main rulebook with the following amendments.
MOVEMENT
Horse = as per main rules
Men-at-Arms = plate armour = minus 1 pip per dice
Billmen = heavy armour = no movement penalty
Archers = light armour = plus 1 pip per dice
Pikemen = light armour = no movement penalty
Mercenary Shot = light armour = plus 1 pip per dice
Peasants = plus 1 pip per dice. (Only one activation per card, two cards in pack, moving back to walled town.)
Ammo cart = minus 1 pip per dice = roads only
FIRING
0-12 13-24 25-36
Longbow 4 5 6 5 6 6
Crossbow 4 5 6 5 6 6
Handgun 4 5 6 5 6 6
Note- Longbows could be fired at a rate of up to 15 per minute, whilst crossbows and handguns were very slow to reload.
It takes one action to fire but two actions to reload a crossbow or handgun.
Due to the rate of fire of a longbow, there is no reload time, so they can potentially fire twice , once for each action every turn.
EFFECT OF HITS
As per rulebook plus:
This will either be an armour save which will result in a point of shock or a kill if the roll is under the number required.
Save
Light Armour 6
Heavy Armour 5 6
Plate Armour 4 5 6
Milanese Armour 3 4 5 6 (Army General only, as very expensive)
HAND-TO-HAND COMBAT
As per rulebook plus any armour saves for would be kills on 6’s that have been rolled.
BONUS DECK
When the bonus card is drawn from the main deck, the next activated unit will draw a card from the separate bonus deck. No more than three cards held at any one time, some cards have to be activated immediately.
The Bonus Cards.
OUT OF AMMO x 2 – if non-missile unit activated, nominate a missile unit to return to wagon for re-supply.
AMMUNITION – you may use this card to re-supply.
AT THE DOUBLE – add 1 dice to movement.
STAND FAST – remove 1 x d6 shock points.
STUCK IN THE MUD – minus 1 pip per dice when that unit next moves.
CHURCH BLESSING – no movement for 1 turn whilst the local priest blesses the unit.
GISBOURNE – rallies to your cause, the peasants inside town walls are now under your control.
LOOTING – 2 x men slope off and placed inside nearest building (not controlled by enemy). Remain until contacted by Big Man
FEAR – Big Man with group retires immediately with as many men as he commands within his control radius for one turn.
DRUNKARD – one man passes out and lost for the rest of the game.
HELLO LADIES – 1 x d6 men placed inside nearest house (not controlled by enemy) immediately until contacted by Big Man.
BROKEN AXLE - no movement for ammo cart for 1 x d6 turns.
RALLY TO YOUR CAUSE – the next house you enter you recruit 1 x d6 peasants.
SWEET TALKER – gate unlocked if peasants are neutral.
REINFORCEMENTS
On turn three, the reinforcement cards are placed into the main pack for activation.
Whichever road your main force enters on, the reinforcements will arrive on the opposite road. SW and SE or NW and NE. (see table/map)
TOWN GATES
The town gates will be locked prior to the arrival of intruders, letting in as many peasants as possible before hand. When outside the gates, you may try to reason with the defenders to join your cause. On a roll of a 6, they will open the gates and join your cause. You may choose to skip the diplomatic approach and attempt to break the gates down. Once you take this approach, all peasants will become hostile towards you for the rest of the game. You will also not be able to use the GISBOURNE or SWEET TALKER Bonus cards once this has happened.
BREAKING DOWN A GATE. (See page 26 TASKS)
The three gates in the town are:
Main Gate = 24
Rear Gate = 24
Side Gate = 18
Peasants defending the gates will hurl rocks, furniture, teapots and anything else they can find at their attackers whilst they are trying to get in.
Range 9 inches.
They will only cause shock on a 4 5 6.
CLIMBING OVER THE TOWN WALLS.
There are several wagons and ladders scattered about the town that could be used to help scale the town walls.
INITIAL DEPLOYMENT.
Start on the road in column two blinds deep, this should enable the other two or three blinds to move onto the table by the end of turn one.
Turn three, on your other road the reinforcements will also deploy in column as blinds.
AMMUNITION WAGON.
An ammunition wagon will come on at the rear of each column and will be used for resupply when a unit comes into base-to-base contact with it.
BLINDS.
There will be an additional blind, seven for the six units. This extra blind may be used with the initial column or placed with the two reinforcement blinds arriving on the other road.
MASTER GISBOURNE.
Gisbourne has been given a Big Man card and when this is drawn out of the pack, he will start activating the defence of the town and the church bells will ring in alarm to bring the workers in from the fields to man the walls and town gates.
SHARP PRACTICE – WAR OF THE ROSES.
BLOODY GREENSTEAD 1477 AD
The effects from the ‘War of the Roses’ reached out far and had an impact on Cities, towns and villages all over Britain, and one such place was the small town of Greenstead.
This sleepy little hollow lay, unfortunately on the boundaries of Watford and Ongar, and ownership was in dispute between their mighty Lords who opposed each other in their support for the Yorkist and Lancastrian struggle.
Both powers were bleeding the town dry of taxes for their war chest and so, when one Lord came up with the initiative of placing a garrison in the town, the other immediately set out to prevent this.
They both made haste, approaching from the North and South roads to meet at what would become known as ‘Bloody Greenstead’ in the race for the control of the town, their hired mercenaries following only a short way behind.
The town official, Master Gisbourne’s priority was the safety of his town and people and so he would be slamming the town gates shut in the face of either Lord at the first sign of any trouble………..Unless of course he could be persuaded otherwise.
OBJECTIVES
Secure and garrison the town of Greenstead before the arrival of your arch enemy without alienating the people if possible. These are your tax paying subjects, so try not to be too heavy handed, as you may well need to recruit a few for future garrison duty.
FORCES INVOLVED.
Big Men: Blue/Murray Green/White Initiative Level Influence Range
Lord Warren Smithson 4 18
Steward Perrill Hook 3 14
Master-at-Arms Snoball Slayton 2 10
Centenar Dancy Wilkinson 2 10
Ventenar Scarlet Will of the Dale 1 6
(Burgundian) (French)
Mercenary The Sire de The Sire de 2 10
Pike Bournonville Lanferelle
Mercenary Brabant Alencon 1 6
Shot
Town Official Gisbourne 1 Inside town walls.
Each retinue has;
Two units of Longbows
One unit of Billmen
One unit of Men-at-Arms
One unit of Mercenary Pike
One unit of Mercenary Shot.
Rich Clarke of 'Too Fat Lardies' fame is collecting ideas to expand on these rules, so here is a few that I have come up with.
SHARP PRACTICE WotR’s Rule Amendments.
VISORS DOWN (activation)
Nominate any unit equipped with plate armour to close
visors. (Will probably have to use a suitable marker to indicate this)
Effects –
1) Additional
plus 1 to armour save against missiles only. (No benefit in hand-to-hand
combat)
2) Minus
1 pip per dice on movement. (Limited vision out of eye slits)
3) Distance
of command radius for Big Man is halved.
RUSTY RIVET (card)
You may play this card on your
opponent by nominating one of his Big Men that already has his visor in the
down position.
Effects –
Visor is jammed shut for the rest
of the game (or set number of turns) due to a rusty rivet or maybe the visor
was damaged in a previous round of combat.
Minus 1 on movement and distance
of command radius halved.
THUNDERSTORM (card)
If drawn from the pack then heavy
rain for the rest of the game (or until the SUN HAS GOT HIS HAT ON card is
drawn, optional).
Effects –
1) Half
range for bows and crossbows.
2) No
firing of black powder.
Archers may spend one of their
activations each turn they shoot, using a bowstring they keep dry under their
hats to negate this effect ( 1 x activation to restring and 1 x activation to
shoot) or they may shoot twice at half range with damp strings.
DOING A STANLEY (Battle of
Bosworth) (2 x cards in pack)
If this card is drawn, the
players unit furthest away from his General will do a STANLEY. (Do nothing for
the rest of the game apart from defend itself if attacked).
You will need to send a Big Man
to reactivate the unit or if a Big Man is already attached to the unit
effected, then a Big Man with a higher rating needs to be sent to get this unit
back on side.
Wow!! Fantastic figs and terrain again. Great AAR report.
ReplyDeleteGreat work Pat, you've really outdone yourself with this report!
ReplyDeleteCheers
Dave!
Nice game! The terrain is gorgeus!
ReplyDeleteWoooow, this table is so great, congratulations !
ReplyDeleteJ-B
Wonderful battle report and very delicious eye candy! :o)
ReplyDeleteStunning AAR Pat !!!
ReplyDeleteA real joy to see and read. Greate terrain, lovely minis and a good story, what more to ask for?
Myby one small thing...the minis that was tiped on the side... was it to symbolice the Chock? can you please paint some casulty markers untill next time? would improve the look of the games untill the unachievable;)
Nice ideea of you to use Sharps Practise for the period, have you considered trying out Dux Britanniarum to?
Looking forward to the next AAR and episode II of the small town of Greenstead and the revenge of Lord Smithson:)
Thanks again for a greate AAR that gives on a lot of inspiration !!!
Best regards Michael
Thanks Chaps.
DeleteMichael, you are absolutely right about those casualty markers improving the look, so many things to paint and not enough hobby time I am afraid. I will get around to painting casualties, along with Perry's WotR wagons and civilians at some point in the future.
As you say, I will have to check out Dux Britanniarum as it will probably be more appropriate for this period.
Thanks again,
Pat.
I totaly understan Pat, to many projects anting ones time, like house, wife, children, work and in the end a whole bunch of minis;)
DeleteLooking forward to follow your project, gives me inspiration to continue mu own 15th century Kalmar Union projec:)
Best regards Michael
Brilliant. Seeing all of the terrain you made recently, put to use, that's just the holy grail of tables. Amazing. Great figures as well. I'm loving the whole thing. This is a perfect example of what wargaming should be.
ReplyDeleteI love it!
Ouaouh!!!! Fabulous, fabulous pictures! One of the only periods you do not play...this AAR makes me want to paint some figures!
ReplyDeleteGorgeus...figures, terrain, report!
Phil.
Wonderfull!! I´ve just read the previous post (terrain) and now I´m sitting here seething with jealousy :-D
ReplyDeleteCheers
paul
Thanks for all the wonderful feedback Chaps.
ReplyDeletePat.
This table is amazing!! Not in one image can you see anything non wargame related. I've never seen anyone using Sharp Practice for a period this early before - but power to you - it looked like it worked well. As mentioned Dux may have some bits and pieces that will suit better - from what I have seen they are very similar though.
ReplyDeleteFrank
http://adventuresinlead.blogspot.com.au/
Awesome photos Pat. A great read too. One "5" and no "6" out of 16, sounds like me!!
ReplyDeleteReally great AAR7 Thanks.
ReplyDeleteAnd a little question - How did you change basic rules of SP?
Can you send me you changing (sergey.diment@gmail.com)?
Thanks Sergey, rule ammendments sent.
DeleteThanks.
DeleteVery interesting
Spectacular! Realy enjoyed this.
ReplyDeleteFantastic looking game Pat - brilliant, figures, terrain and photos! Have you tried Dux Brittaniarum?
ReplyDeleteWhat a superb looking board! Full of the superbly painted figures...and as for your terrain...simply inspiring!
ReplyDeletetotally impressive work all around! i love seeing finely painted perry plastics! totally inspiring! i've already built a standard bearer based on one of your conversions!
ReplyDeleteThanks Chaps.
ReplyDeleteCyrus, I haven't tried those rules yet, are they the ones produced by Too Fat Lardies?
The Res Op, glad you liked the SB and thanks.
Cheers,
Pat.
Thanks Pat for sharing you rule changes !
ReplyDeleteGreate inspiration !
best regards Michael
Lovely job. I think you're right to go with SP for the game over Dux. You have much more flexibility which is a good fit for such a terrain and character driven game. I may have to get the WOTRs figures out of the cupboard!
ReplyDeleteThis was amazing; the rules, models and scenery were all great.
ReplyDeleteAn absolutely amazing post; a real treat for the eyes!
ReplyDeleteFantastic scenery and figures! You did a great job on everything.
ReplyDeleteTed
Beautiful scenery and fantasic images of a great looking game.
ReplyDeleteNow that's what I call an awesome battle report! Great terrain, background and write up Silver!
ReplyDeleteChristopher
A beautiful game. Words can't do it justice. Colour me impressed.
ReplyDeleteI never thought of using the Sharpe Practice rules for this period. Very clever. I may steal that idea.
One of the most impressive posts I've seen in a while. Great pictures and report and on top of that it includes a SP variant. Inspiring stuff!
ReplyDeleteWonderful looking stuff, makes me want to break out my medieval stuff!
ReplyDeleteUtterly ace photos, Pat. As always, you really capture a sense of place with your terrain and game set-ups. A perfect "ad" for the Perry WotR range.
ReplyDeleteBest wishes
Giles
Thanks again Chaps for your wonderful comments.
ReplyDeleteJust to clarify how I use the 'Bonus Deck' in SP. I place one card in the 'Game Deck' for the Bonus Deck and if this gets drawn, the next unit activated draws a card from that pack. In the rulebook (page 12) it states that if more 1's than 6's are rolled then a random event occurs (with the chance of a Bonus Card being drawn). I found that we kept forgetting to check the 1's v 6's and not using the Bonus Deck. Placing a BD card in the main deck resolved this. Hope this helps and makes sense.
Cheers,
Pat.
....must ....resist .....starting ....yet another ....period.
ReplyDeleteThat game looks great.
I love this! Great idea for Sharp Practice. Can't believe it works so well!
ReplyDeleteMy bank account despises you, however.
Pat I apologise for pinching your idea for converting SP to WotR - it's great and works a treat. I believe Rich Clarke is having a go so praise indeed !
ReplyDeleteI see you live at Ongar. I'm in Billericay if you ever want another local gamer !
Steve Dix (NORSEYGAMER)
Thanks once again Chaps.
ReplyDeleteSteve Dix, you are more than welcome. I will send you a pm.
Cheers,
Pat.
Wowee-wow-wow!
ReplyDeleteI'm with Michael (Dalauppror) in using Dux Brit but I'm wondering whether SP with all the shooting might be more appropriate. Whether it is or is not is relative. What's clear is that this is a clever translation.
And the terrain and models are just delightful. Would love a run down of the sources of your buildings but you have better things to do that provide an inventory.
Marvelous!!!!
Hi DG and thanks.
DeleteThe building are:
Town walls - Empress Miniatures
Main Town - 4ground, Grand Manner, TM Terrain(butter market), and scratch built.
Thatched roof buildings outside town - The two identical buildings are '4Ground', the thatched barn is from Grand Manner and the other building is the Perry building with teddy bear fur added, PVA glued and painted.
Hope this helps.
Pat.
PS - Are all your SP amendments captured at the end of this post?
ReplyDeleteOr could you send me a pm/em with an attachment.
You should earn a TFL commission as I'll be going there next to purchase SP.
Cheers!
Yes, all the SP amendments are at the end of the blog. This was only a first draft and probably needs a few games to fine tune to get the sort of game that you want.
ReplyDeleteI was thinking about crossbows/handguns historically being more effective at penetrating armour at close range (minus 1 on armour saves from xbows at close range) but crossbows being less accurate at anything over short range?(needing a 6 on anything over 12inches)
Superlative idea!!!
ReplyDeleteIncredible! Great work here! I just did the Battle of Severn from WOR. You may like to look at it on my blog. I used a modified version of Tactica Mideval. I would love to hear your feedback. www.cigarboxbattle.com
ReplyDeleteFantastic work on the WOTR figures and terrain, Pat. I will use your great photos as a go-by when I paint my own figures.
ReplyDeleteClay
Thanks chaps. Great to see this page still being visited after all this time.
ReplyDeleteCheers,
Pat.
Wow - this is fantastic, Pat. Apologies for overlooking this masterpiece of game and figures when it was first posted, but I've recently been perusing sites for ideas on a Bosworth Field terrain set up. BTW, I would never had thought of using SP for this - but you made it work beautifully. Best, Dean
ReplyDeleteThanks Dean. Looking forward to seeing what you do with your Bosworth set up.
ReplyDeletePat.
Hello Mr. Pat.
ReplyDeleteI've read many gaming blogs, and seen many photos, and I would like to say that this is one of the absolute finest examples of a single wargamming post that I have ever seen.
It has a detailed description, not only the turn by turn but also specifics on the game itself. An impressively thorough recording of the game, and more than just blurry a bird-eyes photo at the end of each round. I appreciated that you re-staged the game afterwords, as you yourself released the rushed real-time pictures were lackluster. The inclusion at the end of the modifications to the rules is quite a nice bonus, as is the brief historical summery at the beginning.
But better than the words or pictures is the contents of those photos themselves! Bravo sir, it looks strikingly fantastic. Large numbers of beautifully painted miniatures set among equally striking terrain. I enjoyed your prior post before this one focusing on the table itself, my favorite terrain pieces actually being your excellent partially harvested wheat fields. Again, the models on both sides are fantastic examples of the hobby side of wargamming!
Side note: I noticed your Denethor model from the GW Lord of the Rings game! I was very fond of that game and the models were great, it's a shame to see it abandoned.
I have a question if you don't mind. I've done a lot of gaming with 1/72, or ~20mm, miniatures ever since Games Workshop went to hell, though I did a bit with Warhammer and the LotR game years ago. Lately I've been itching to get back into the 28mm scene in a historical context and a period like The War of the Roses is right up my alley of interest.
The other comments have informed me that the miniatures here are (mostly ;]) one of the Perry lines. Ignoring such things as paint, bases, and any conversions you may have done, I was curious as to how much the armies depicted in this post cost? I don't need specifics for the exact units used here, but a general estimate would be much appreciated. Perry's website has a catalog of course but that is not very helpful in determining how much useful, playable forces would run a person looking to dig back into the 28mm scene.
Thanks in advance Sir, and again, truly, this is a fantastic blog, from the written content to the things on the tabletop.
- Brandon
Hi Brandon and thanks very much for your kind words.
DeleteThe figures are made up from three boxes of Perry Miniatures plastic, which cost £20 a box and four mounted Perry figures which cost £8 or £8.50 for three figures. The civilians are from Wargames Foundry which cost £12 for eight figures. So total cost for figures about £90 to £100 ish. Hope this helps,
Pat.
Indeed it does. Thank you very much Sir. I hope your blog continues for many years.
ReplyDelete- Brandon
hey Pat, Have you tried using these rules with sharp practice V2 yet? I'm currently trying to update them, but i'm curious on how you did it :)
ReplyDeleteHi Hendrik,
DeleteI have used SPV2 quite a few times with Napoleonic and the AWI and I find them a big improvement on SPV1 but I have yet to try them with WotR's, I look forward to seeing your update.
Merry Christmas,
Pat.